Understanding Nutanix by Breaking It (Safely): AHV vs CVM vs ESXi — and Why This Finally Clicked for Me
December 30, 2025
This last blog post of 2025 is unapologetically long — and that’s intentional. My goal is to help SEs who are studying for NCP-MCI exam. I haven’t taken it yet myself, but one can hope.
I started writing it after the recent Nutanix and Pure Storage integration announcements (Nutanix + Pure Storage overview and the joint solution brief), because it made me pause and ask a simple but uncomfortable question: how can we meaningfully talk about a joint solution to customers and prospects if we don’t actually understand the underlying architecture of one (or both) platforms? Feel free to comment below.
Nutanix marketing, training, and slideware often assume a baseline familiarity with concepts like AHV (Acropolis Hypervisor), AOS (Acropolis Operating System — the distributed storage and data services layer), and Acropolis itself (the control plane that ties compute, storage, and virtualization together).
For someone new — or even someone experienced but coming from a traditional SAN or VMware-first background — that context is not always obvious. This post exists to slow things down, strip away the buzzwords, and rebuild Nutanix from first principles, using hands-on lab work (including Community Edition) to make the architecture tangible.
Some of the terminology, structure, and concepts referenced here are drawn from Nutanix official training resources, and credit is absolutely due to the Nutanix education and training teams for the foundational material — any opinions, simplifications, jokes, or architectural scars documented here are mine alone. If we want to evaluate, design, or even debate a Nutanix + Pure Storage solution with credibility, we owe it to ourselves to understand what’s actually running under the hood before we talk about how two platforms come together.
If you’re new to Nutanix, the architecture can feel like someone handed you a Russian nesting doll and said, “Trust me, it’s simple.”
It is simple — after you understand the layers.
Until then, it’s confusing in exactly the way distributed systems usually are.
This post is my attempt to fix that — for myself first, and hopefully for you too. I will try rebuilding Nutanix from the ground up, following the same structure as the official training, but with one goal:
Make the architecture feel inevitable instead of confusing.
By the end, Nutanix should feel less like a collection of oddly named services and more like a very opinionated — and very consistent — distributed system.
Nutanix Design & Architecture — Explained Clearly (NCP-MCI Prep)
Nutanix training tends to throw a lot of terminology at you very quickly:
Nodes.
Blocks.
CVMs.
Containers.
Zeus.
Stargate.
Prism.
Replication Factor.
Failure Domains.
None of these are inherently hard.
They’re just introduced before the underlying logic is explained.
An Introduction to Nutanix
At its core, Nutanix is a software-defined distributed storage platform that runs alongside your virtual machines and turns local disks into a shared, resilient datastore.
Three ideas define everything Nutanix does:
- Storage is distributed
- Intelligence lives in software
- Failures are expected, not exceptional
Everything else is an implementation detail.
If you keep these three ideas in your head, Nutanix stops feeling mysterious very quickly.
The Core Components of the Nutanix Solution
Nutanix has three fundamental layers.
Confusing these is the #1 cause of pain for new users.
1. The Hypervisor Layer (Compute)
This is the boring part — and that’s a compliment.
Examples:
- AHV (Nutanix’s hypervisor)
- ESXi
- Hyper-V (legacy)
What the hypervisor does:
- Runs virtual machines
- Schedules CPU and memory
- Talks to hardware
What it does not do:
- Storage intelligence
- Replication
- Data protection logic
Think of it as:
“I run VMs. That’s it.”
2. The Controller VM (CVM)
This is the most important concept in Nutanix.
Every node runs a Controller VM (CVM). That VM:
- Owns all storage intelligence
- Runs the distributed storage services (AOS / DSF)
- Communicates with other CVMs to form a cluster
The CVM is not a helper. It is the storage platform. If Nutanix were a SAN, the CVMs would be the controllers — except they scale horizontally and live inside your cluster.
This is the moment Nutanix becomes different from traditional storage.
3. Prism (Management Layer)
Prism is how you interact with Nutanix. It provides central access for administrators to configure, monitor, and manage virtual environments by combining several aspects of datacenter management into a single, easy-to-use solution. Using machine learning technology, Prism can mine large volumes of system data easily and quickly and generate actionable insights for optimizing all aspects of virtual infrastructure management.
- Prism Element (PE) → manages a single cluster
- Prism Central (PC) → manages multiple clusters
Important clarification:
Prism does not “do” storage.
Prism orchestrates and visualizes what the CVMs are already doing.
If Prism vanished tomorrow, your cluster would still run — you’d just be flying blind.
Nodes, Blocks, and Clusters (Less Scary Than They Sound)
Node
A node is one server running:
- A hypervisor
- A CVM
- Local disks
That’s it.
Three types of nodes are available: HCI, compute, and storage.
- A HCI node is the most common type of node. It includes CPU, memory, and storage in a single physical chassis.
- A storage-only (SO) node has the bare minimum CPU capacity, but a significant amount of onboard storage.
- A compute-only (CO) node has the bare minimum onboard storage, but a significant amount of CPU and memory.
Block
A block is a vendor packaging term:
- A group of nodes sold together
- Electrically and operationally irrelevant to the software
In a typical Nutanix cluster, a block is a chassis that holds from one to four nodes, and contains power, cooling, and the backplane for the nodes (Think Blade Center). The number of nodes and drives depends on the hardware chosen for the solution.
The exam cares about nodes, not blocks.
Cluster
A cluster is where Nutanix actually exists.
A Nutanix cluster is a logical grouping of physical and logical components. A single Nutanix cluster can consist of one, two, three, four, or more nodes, and these nodes can be housed in one or more blocks. Since a cluster is both a physical and a logical grouping, it is possible for nodes in a single block to belong to different clusters. Joining multiple nodes in a cluster allows for resources to be pooled. As an example, all storage hardware in a cluster (that is, all SSDs and HDDs (I know!!! Right?)) is presented as a single storage pool. All components run on multiple nodes in the cluster and depend on connectivity between their peers. Most components also depend on other components for information.
It is:
- A group of nodes
- Whose CVMs cooperate
- To present a single storage pool and control plane
- With defined failure domains
No cluster → no Nutanix magic.
Nutanix Storage Building Blocks
Once nodes form a cluster, several logical constructs appear.
Storage Pool
A storage pool aggregates raw disk (PCIe SSD, SSD and HDD) capacity across nodes. The storage pool can span multiple Nutanix nodes and is expanded as the cluster scales. Most configurations use only one storage pool.
Think:
“All the disks we’re willing to use.”
Storage Container
A storage container is a logical segmentation of the Storage Pool and contains a group of VMs or files (vDisks). Some configuration options (such as Replication Factor) are configured at the container level but are applied at the individual VM or file level. Containers typically have a 1 to 1 mapping with a datastore (in the case of NFS or SMB).
A container is where policy lives:
- Compression
- Deduplication
- Erasure Coding
- Replication Factor
VM disks live inside containers.
vDisk
A vDisk is a subset of available storage within a storage container that provides storage to virtual machines. A vDisk is any file over 512 KB in AOS Storage, including VMDKs and VM disks. vDisks are broken up into extents, which are grouped and stored on physical disk as an extent group. The Nutanix platform now allows you to migrate a vDisk from one storage container to another, while it is attached to a guest VM without needing to shutdown or delete that VM.
Just think of a vDisk as the virtual disk attached to a VM. It inherits all policies from the container.
You don’t manage blocks.
You manage intent.
Cluster Creation: Why Nutanix Is Strict (On Purpose)
Cluster creation is intentionally unforgiving.
Nutanix validates:
- Disk count and roles
- Network reachability
- Service readiness
- Failure domain feasibility
If something is wrong, cluster creation fails early and loudly.
This isn’t a flaw.
It’s a safety mechanism.
When I was trying to build an Community Addition Nutanix VM nested on ESXi, I ran into some disk visibility problems:
nutanix@NTNX-92e81ed6-A-CVM:192.168.1.22:~$ cluster status
2025-12-29 21:00:53,527Z CRITICAL MainThread cluster:3241 Cluster is currently u                                 nconfigured. Please create the cluster.
nutanix@NTNX-92e81ed6-A-CVM:192.168.1.22:~$ cluster -s 192.168.1.22 create
2025-12-29 21:01:55,541Z INFO MainThread cluster:3302 Executing action create on SVMs 192.168.1.22
2025-12-29 21:01:55,542Z INFO MainThread security_helper.py:653 Valid security configuration received.
2025-12-29 21:01:55,553Z ERROR MainThread cluster:1190 Cannot create one node backup cluster as **not enough boot ssds are present** to facilitate backup on this cluster Available no of boot ssds is 1
2025-12-29 21:01:55,554Z ERROR MainThread cluster:3467 Operation failed
nutanix@NTNX-92e81ed6-A-CVM:192.168.1.22:~$

nutanix@NTNX-92e81ed6-A-CVM:192.168.1.22:~$ lsblk
NAME   MAJ:MIN RM  SIZE RO TYPE MOUNTPOINT
loop0    7:0    0    1G  0 loop /var
loop1    7:1    0  512M  0 loop /var/tmp
loop2    7:2    0   50M  0 loop /var/log/audit
sda      8:0    0    2T  0 disk
├─sda1   8:1    0   10G  0 part /
├─sda2   8:2    0   10G  0 part
├─sda3   8:3    0   40G  0 part /home
└─sda4   8:4    0  1.9T  0 part /home/nutanix/data/stargate-storage/disks/drive-ua-acdd0430-b219-4df0-b7
sr0     11:0    1   60M  0 rom
Nutanix would rather refuse to build a cluster than let you build one that will corrupt data later.
Security & Hardening (High Level, Exam Relevant)
The Nutanix Controller VM supports STIG compliance with the RHEL 7 STIG as published by DISA. STIG rules are capable of securing the boot loader, packages, file system, booting and service control, file ownership, authentication, kernel, and logging. SaltStack and SCMA are used to self-heal any deviation from the security baseline configuration of the operating system and hypervisor to remain in compliance. If any component is non- compliant, then the component is set back to the supported security settings without the need for manual intervention.
The Nutanix platform and all products leverage the Security Configuration Management Automation (SCMA) framework to ensure that services are constantly inspected for variance to the security policy. SCMA checks multiple security entities for both Nutanix storage and AHV, automatically reports and logs inconsistencies, and then reverts entities to the baseline as needed. With SCMA, you can schedule the STIG to run hourly, daily, weekly, or monthly. Running the STIG does not affect system performance since it has the lowest system priority within the virtual storage controller, allowing you to run checks as frequently as your company policies require.
Security in Nutanix is layered:
- CVMs are hardened appliances
- Services run with role separation
- Certificates are generated at cluster creation
- RBAC is enforced through Prism
The exam doesn’t care about crypto math.
It cares where security controls live.
Key idea:
You do not treat CVMs like general-purpose Linux servers.
Networking (Simple, but Different)
Nutanix networking is simple conceptually:
- CVMs require reliable management connectivity
- Storage traffic uses standard IP networking
- AHV uses Linux bridges or OVS
The key mental shift:
Storage traffic is east–west, not north–south.
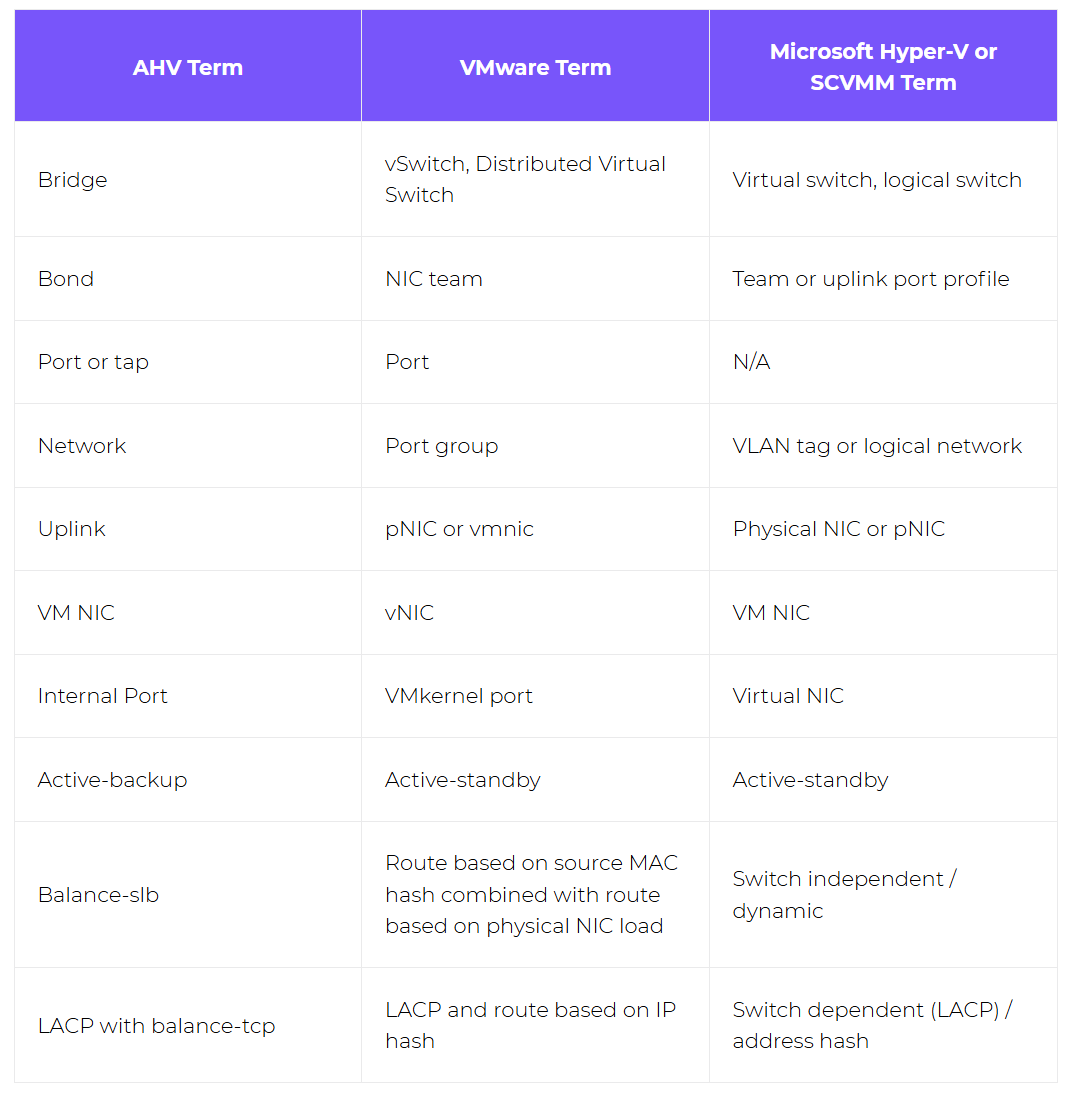
If your backgound is VMware or Hyper-V, here is the network terminology comparison table for you.
VM Lifecycle, Migration, and Operations
VM management in Nutanix is intentionally unified:
- Create
- Snapshot
- Clone
- Migrate
- Protect
All of it flows through the same control plane.
Migration decisions are driven by:
- Resource availability
- Policy compliance
- Failure domain awareness
Monitoring, Automation, and DR
Monitoring is built in:
- Performance
- Health
- Capacity
- Alerts
Automation builds on visibility:
- APIs
- Runbooks
- Policy-driven actions
Data protection is a design goal, not an add-on:
- Snapshots are cheap
- Replication is policy-based
- Maintenance assumes failure will happen
The Mental Model That Actually Matters
If Nutanix ever starts to feel confusing again, come back to this:
- Hypervisor runs VMs
- CVM runs storage
- Prism explains what’s happening
- Clusters exist to survive failure
- Policies matter more than procedures
If you understand that, the terminology stops being scary — and the NCP-MCI questions start answering themselves.
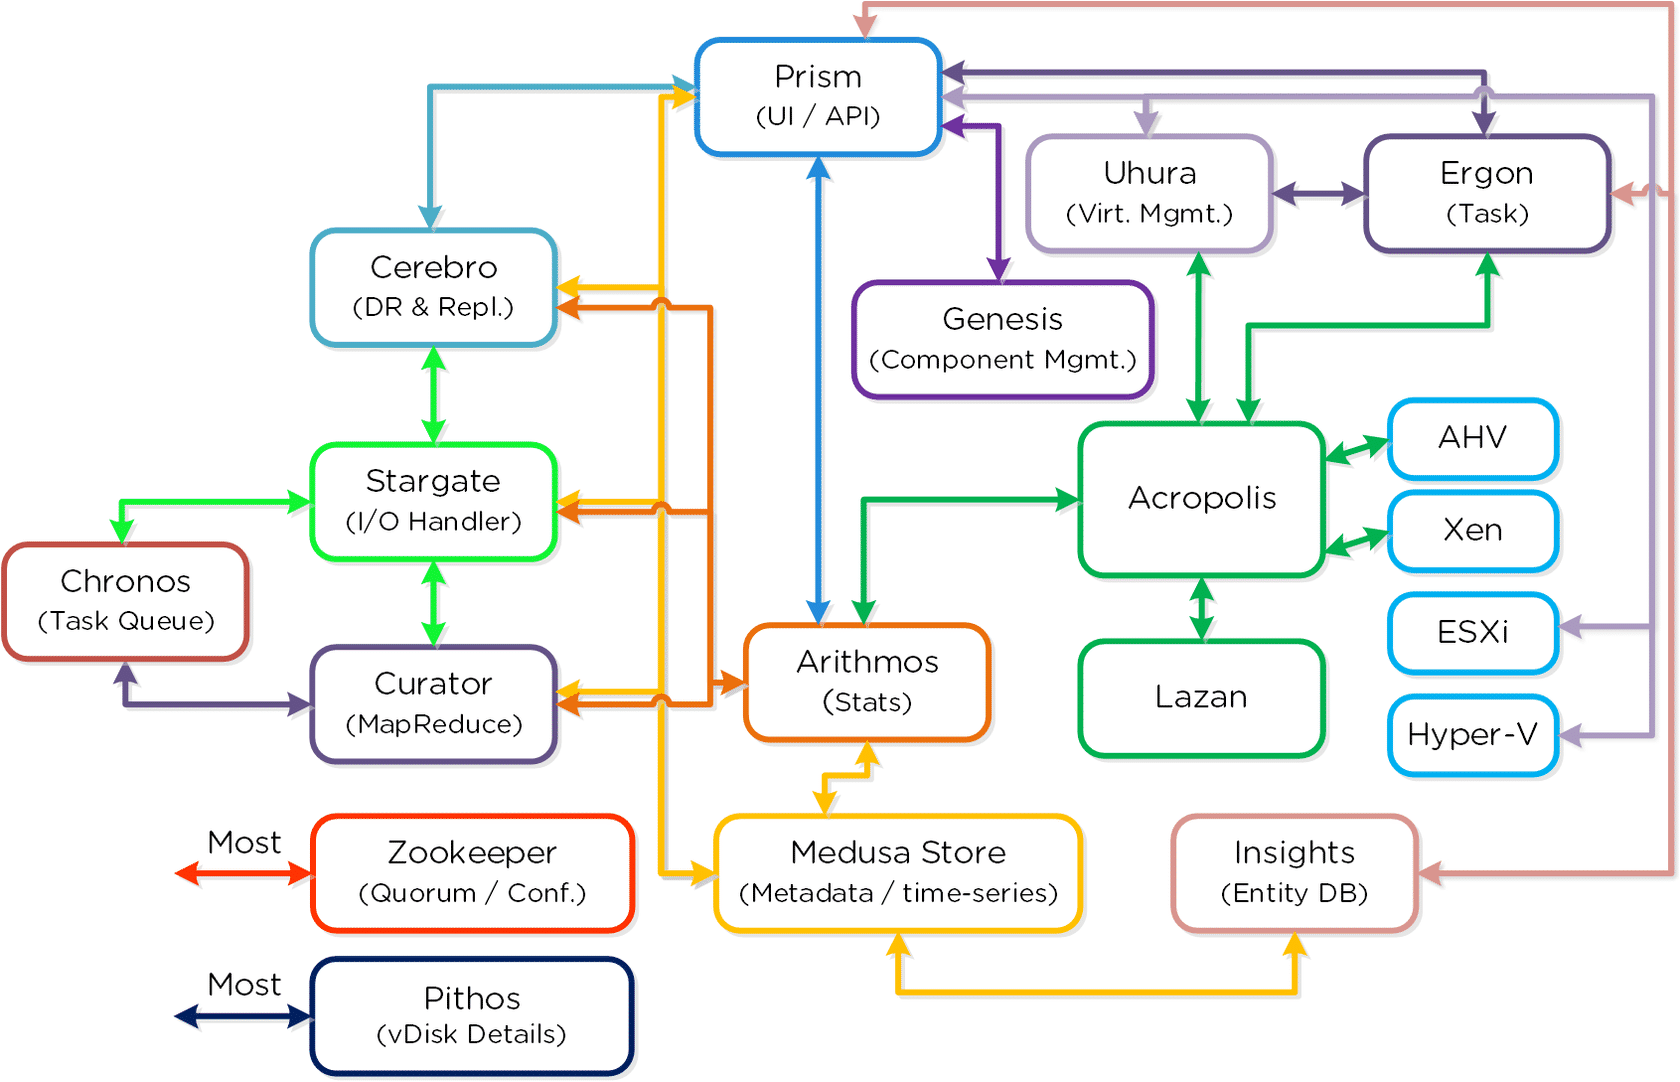
Appendix: Explaining That Diagram Without Losing Your Sanity
At some point in Nutanix training, you are shown the diagram. You know, the one from the top of this post
Twenty-plus boxes.
Rainbow arrows.
Mythical names.
Exactly zero guidance.
This section exists so that diagram never intimidates you again.
The Trick: It’s Four Systems, Not One
That diagram is not one workflow.
It’s four planes, drawn all at once:
- Management & APIs
- Control Plane
- Data Plane
- Background & Optimization
Once you sort services into those buckets, the chaos drops by ~70%. You gotta love statistics - show a big percent number and a reader gets a shot of dopamine.
Control Plane, Data Plane, and Friends (Human Translation)
Zeus — Cluster Truth
- Metadata
- Leadership
- Cluster membership
If something involves who’s in charge → think Zeus.
Stargate — Data I/O
- VM reads and writes
- Replication
- Performance
If something involves VM I/O → think Stargate.
Curator — Optimization
- Rebalancing
- Cleanup
- Efficiency over time
If something improves after deployment → think Curator.
How to Read the Diagram Like an Architect
Here’s the cheat code:
- Ignore the names
- Group by responsibility
- Follow intent, not arrows
If a service:
- Touches disks → data plane
- Coordinates state → control plane
- Schedules work → background plane
- Shows UI → management plane
Suddenly the diagram stops looking like spaghetti.
Why I Built Nutanix CE Nested on ESXi
To force myself to actually understand this — not just memorize exam answers — I decided to build Nutanix Community Edition nested on ESXi.
And yes… I broke it.
Several times.
Mostly on purpose. Well, not really - I was just a blind kitten bumping into walls.
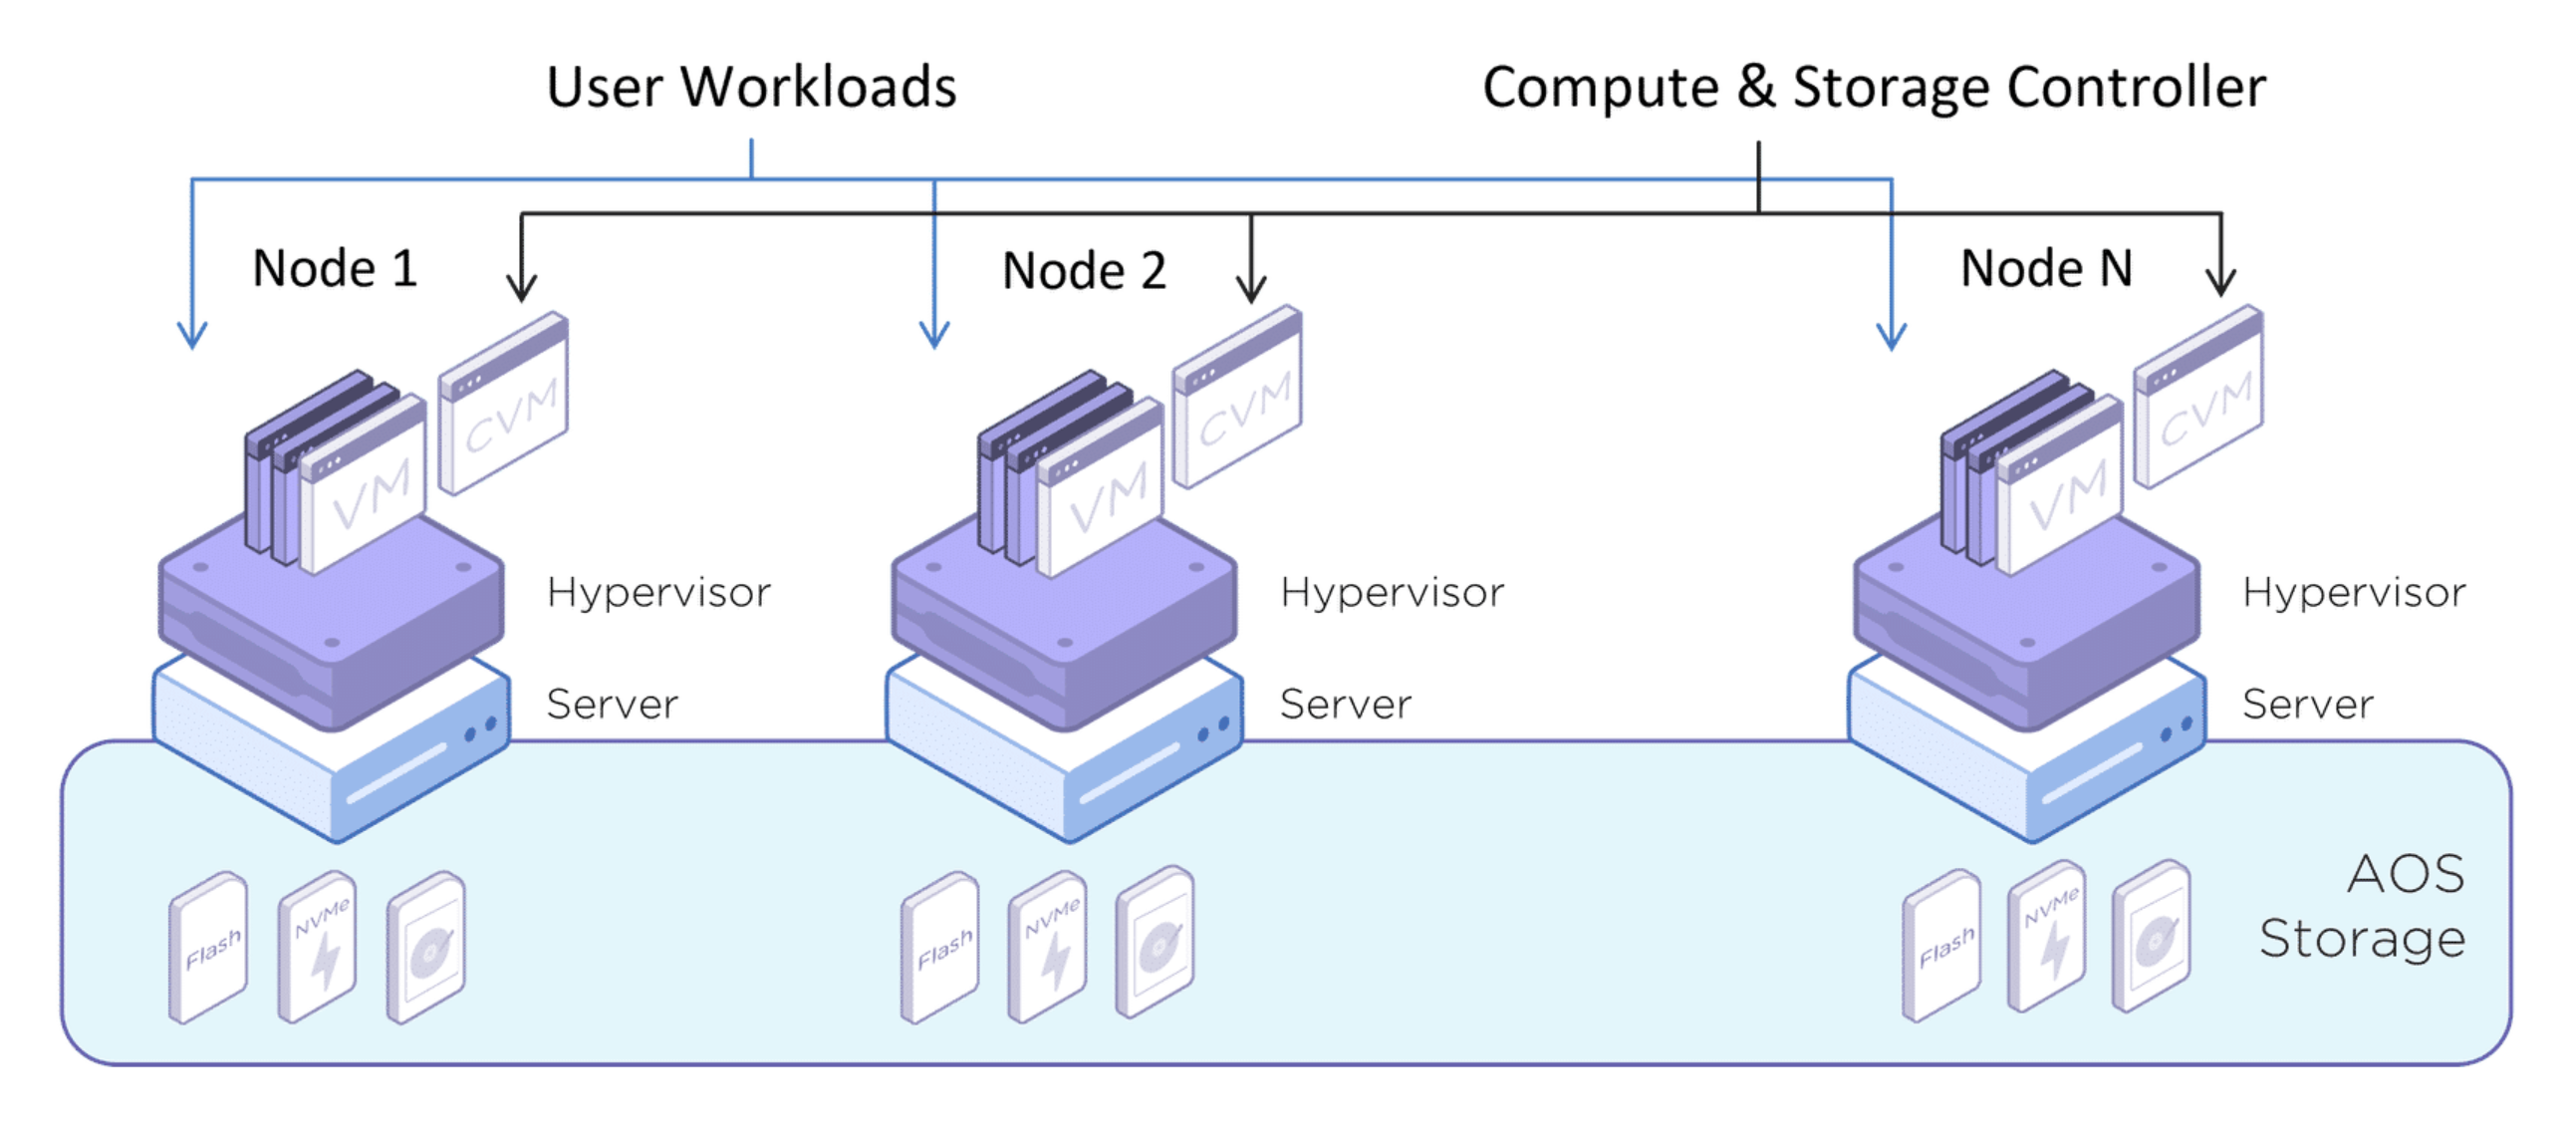
The One Diagram That Made Everything Click
If you remember nothing else, remember this:
AHV owns hardware.
CVM owns intelligence.
Prism is just the UI on top.
Most newbie mistakes are simply doing the right thing — on the wrong layer.
Building Nutanix CE Nested on ESXi
(a.k.a. I Learned More by Breaking This Than Any Slide Deck Ever Taught Me)
This is the part of Nutanix training that should exist but doesn’t: the hands-on, build-it-break-it-fix-it-understand-it walkthrough.
I’m running Nutanix Community Edition (CE) as a nested VM on top of ESXi. This section is intentionally detailed, because the fastest way to actually understand Nutanix architecture is to trip over the layers a few times and then finally realize why those layers exist.
If you’re studying for NCP-MCI, this section is gold — not because it’s pretty, but because it forces the exact mindset the exam expects.
Lab Overview: What’s Running Where
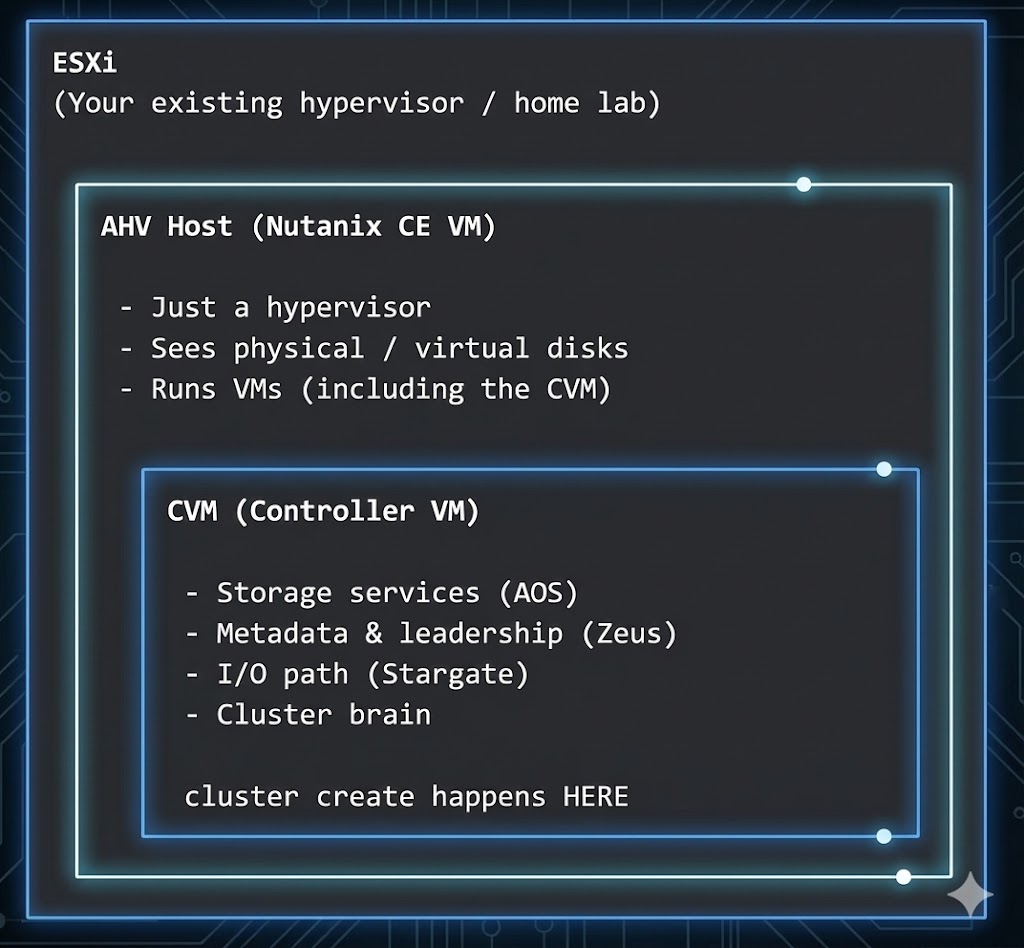
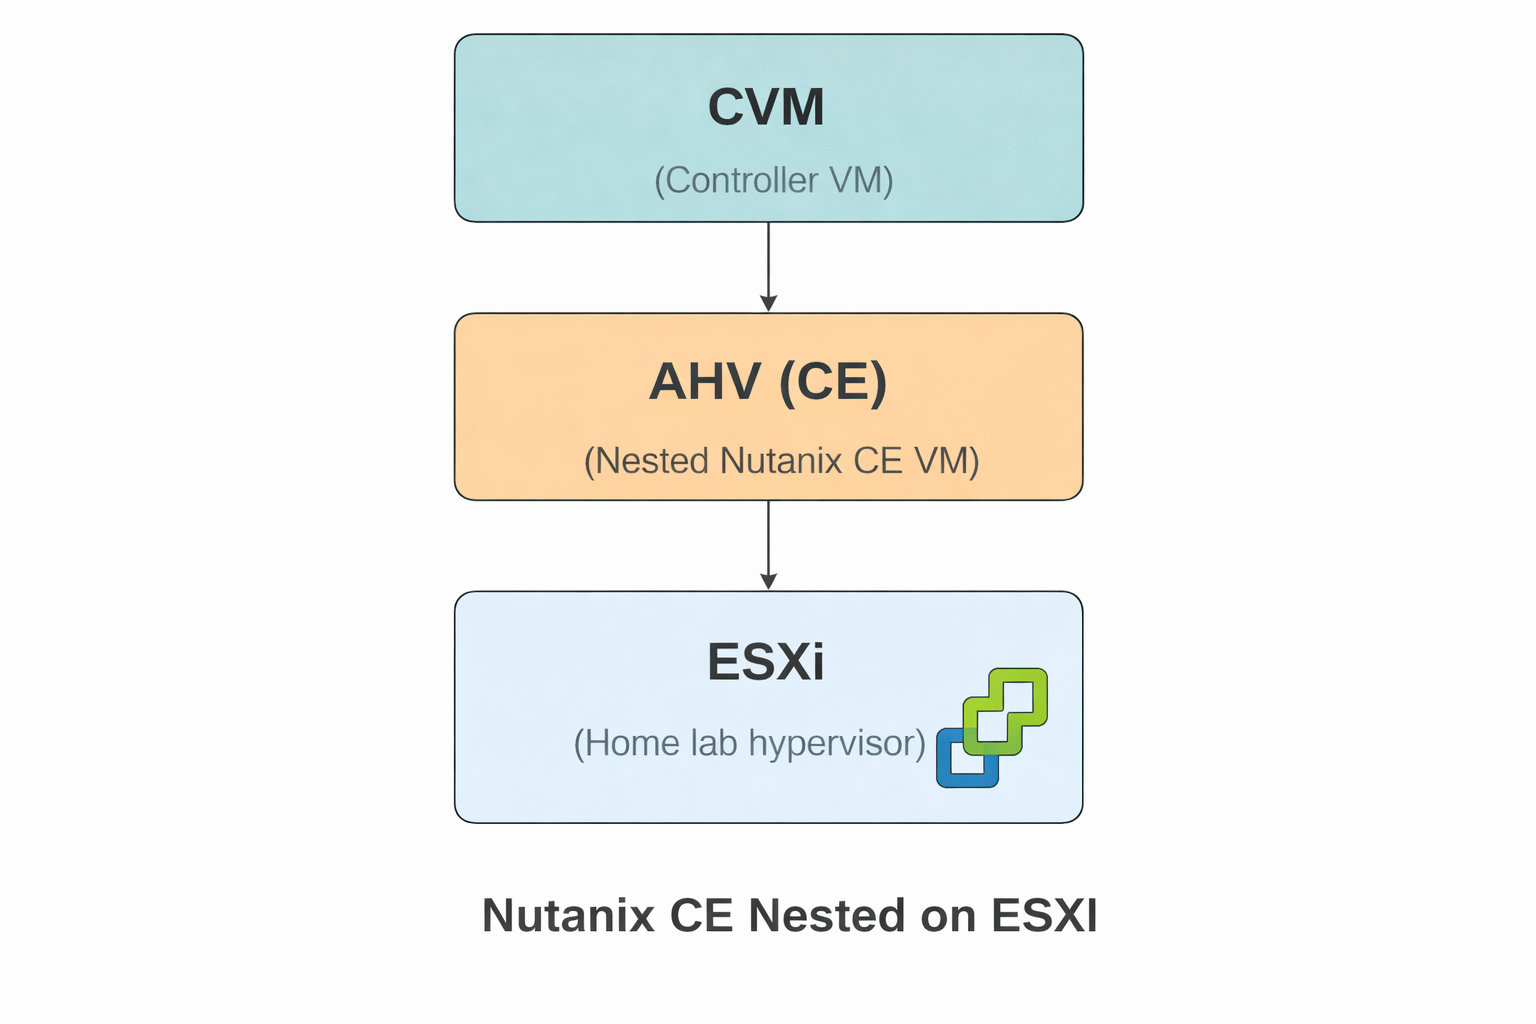
I have three layers in my lab. Most confusion comes from mixing them up.
- ESXi – My home lab hypervisor. Hosts the Nutanix CE VM.
- Nutanix CE VM – This VM is the AHV host.
- CVM (Controller VM) – Runs inside the CE VM and owns all storage intelligence.
One of these days I will have to figure out if I can connect the CE VM to an external Pure Storage FlashArray (that is for another day)
Mental model (burn this in):
- ESXi hosts the CE VM
- CE VM is the AHV host
- CVM runs inside AHV and does the thinking
Step 1 — Create the Nutanix CE VM on ESXi
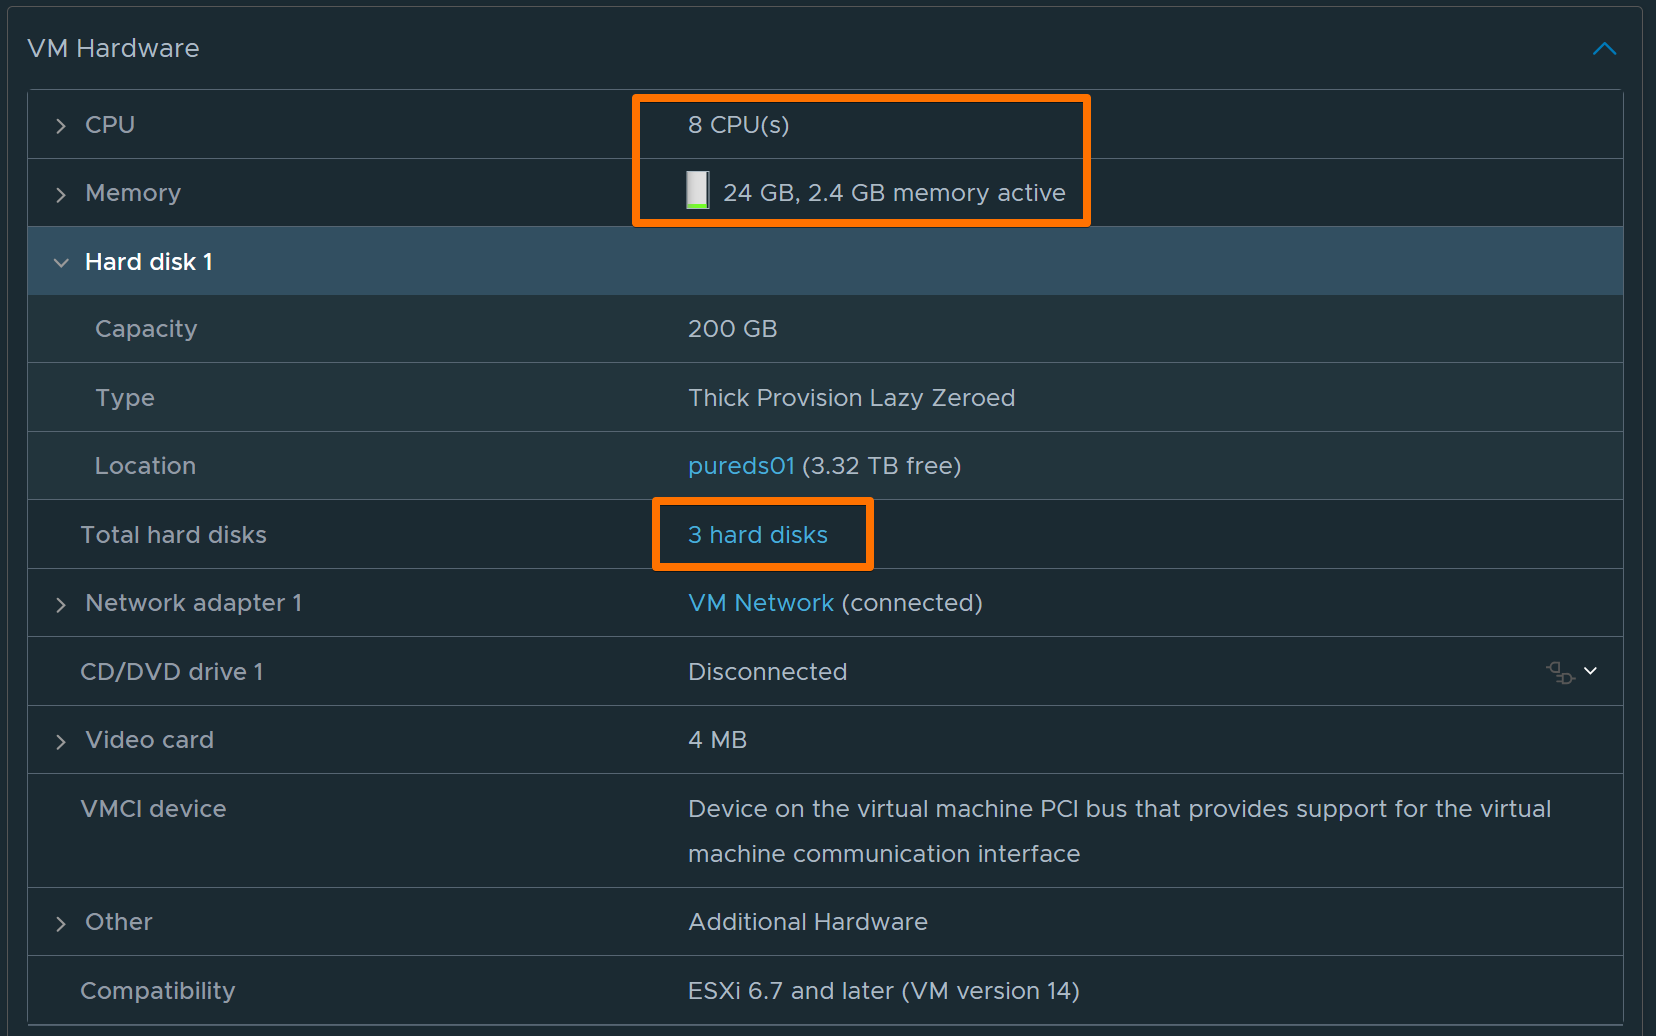
Recommended VM Settings
- vCPU: 8
- Memory: 24 GB
- Disks:
- 200 GB (AHV OS)
- 2 TB (data)
- 300 GB (data / single-node eligibility)
- Network: VM Network (connected)
- CD/DVD: Nutanix CE ISO
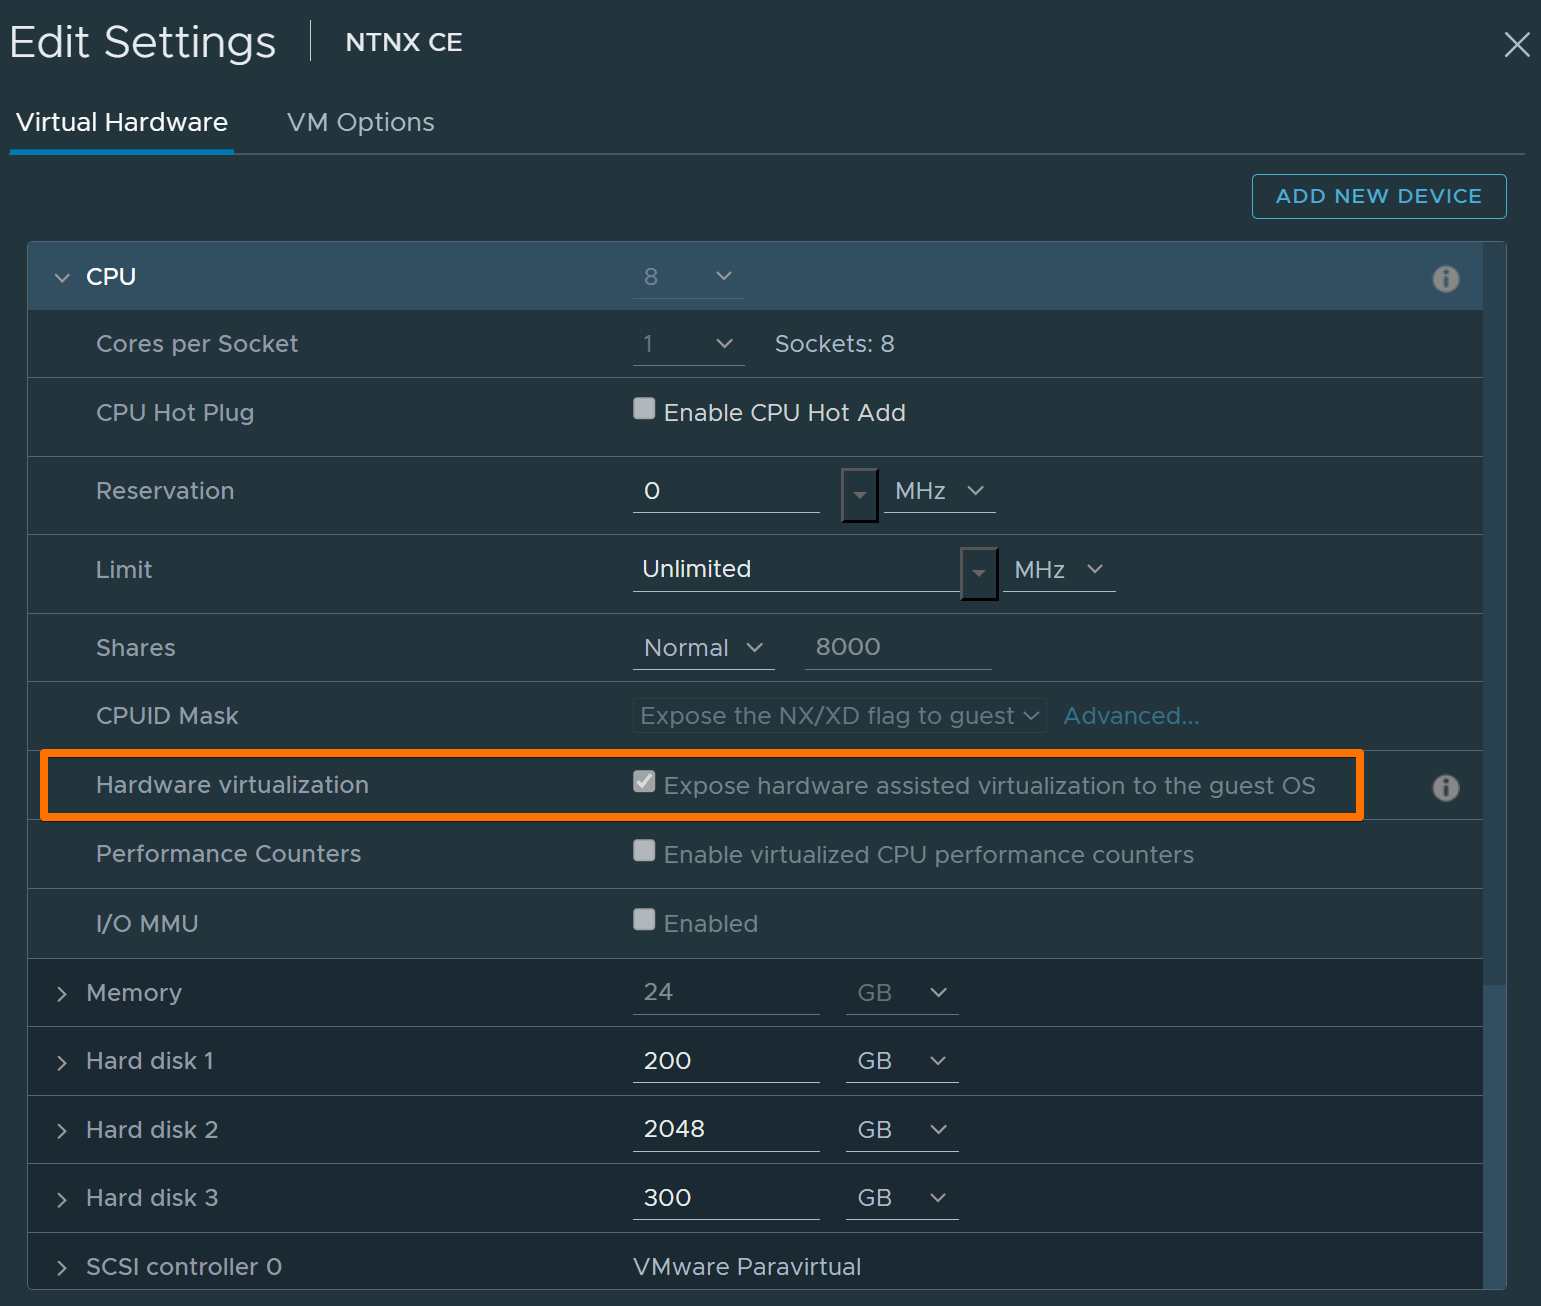
- Nested virtualization: ENABLED
Common Failure: Nested Virtualization Disabled
Error example:
System does not have VT-x (vmx) or Secure Virtual Machine(svm) enabled.
Fix: Enable nested virtualization in ESXi (Expose hardware-assisted virtualization to the guest OS).
Power on:
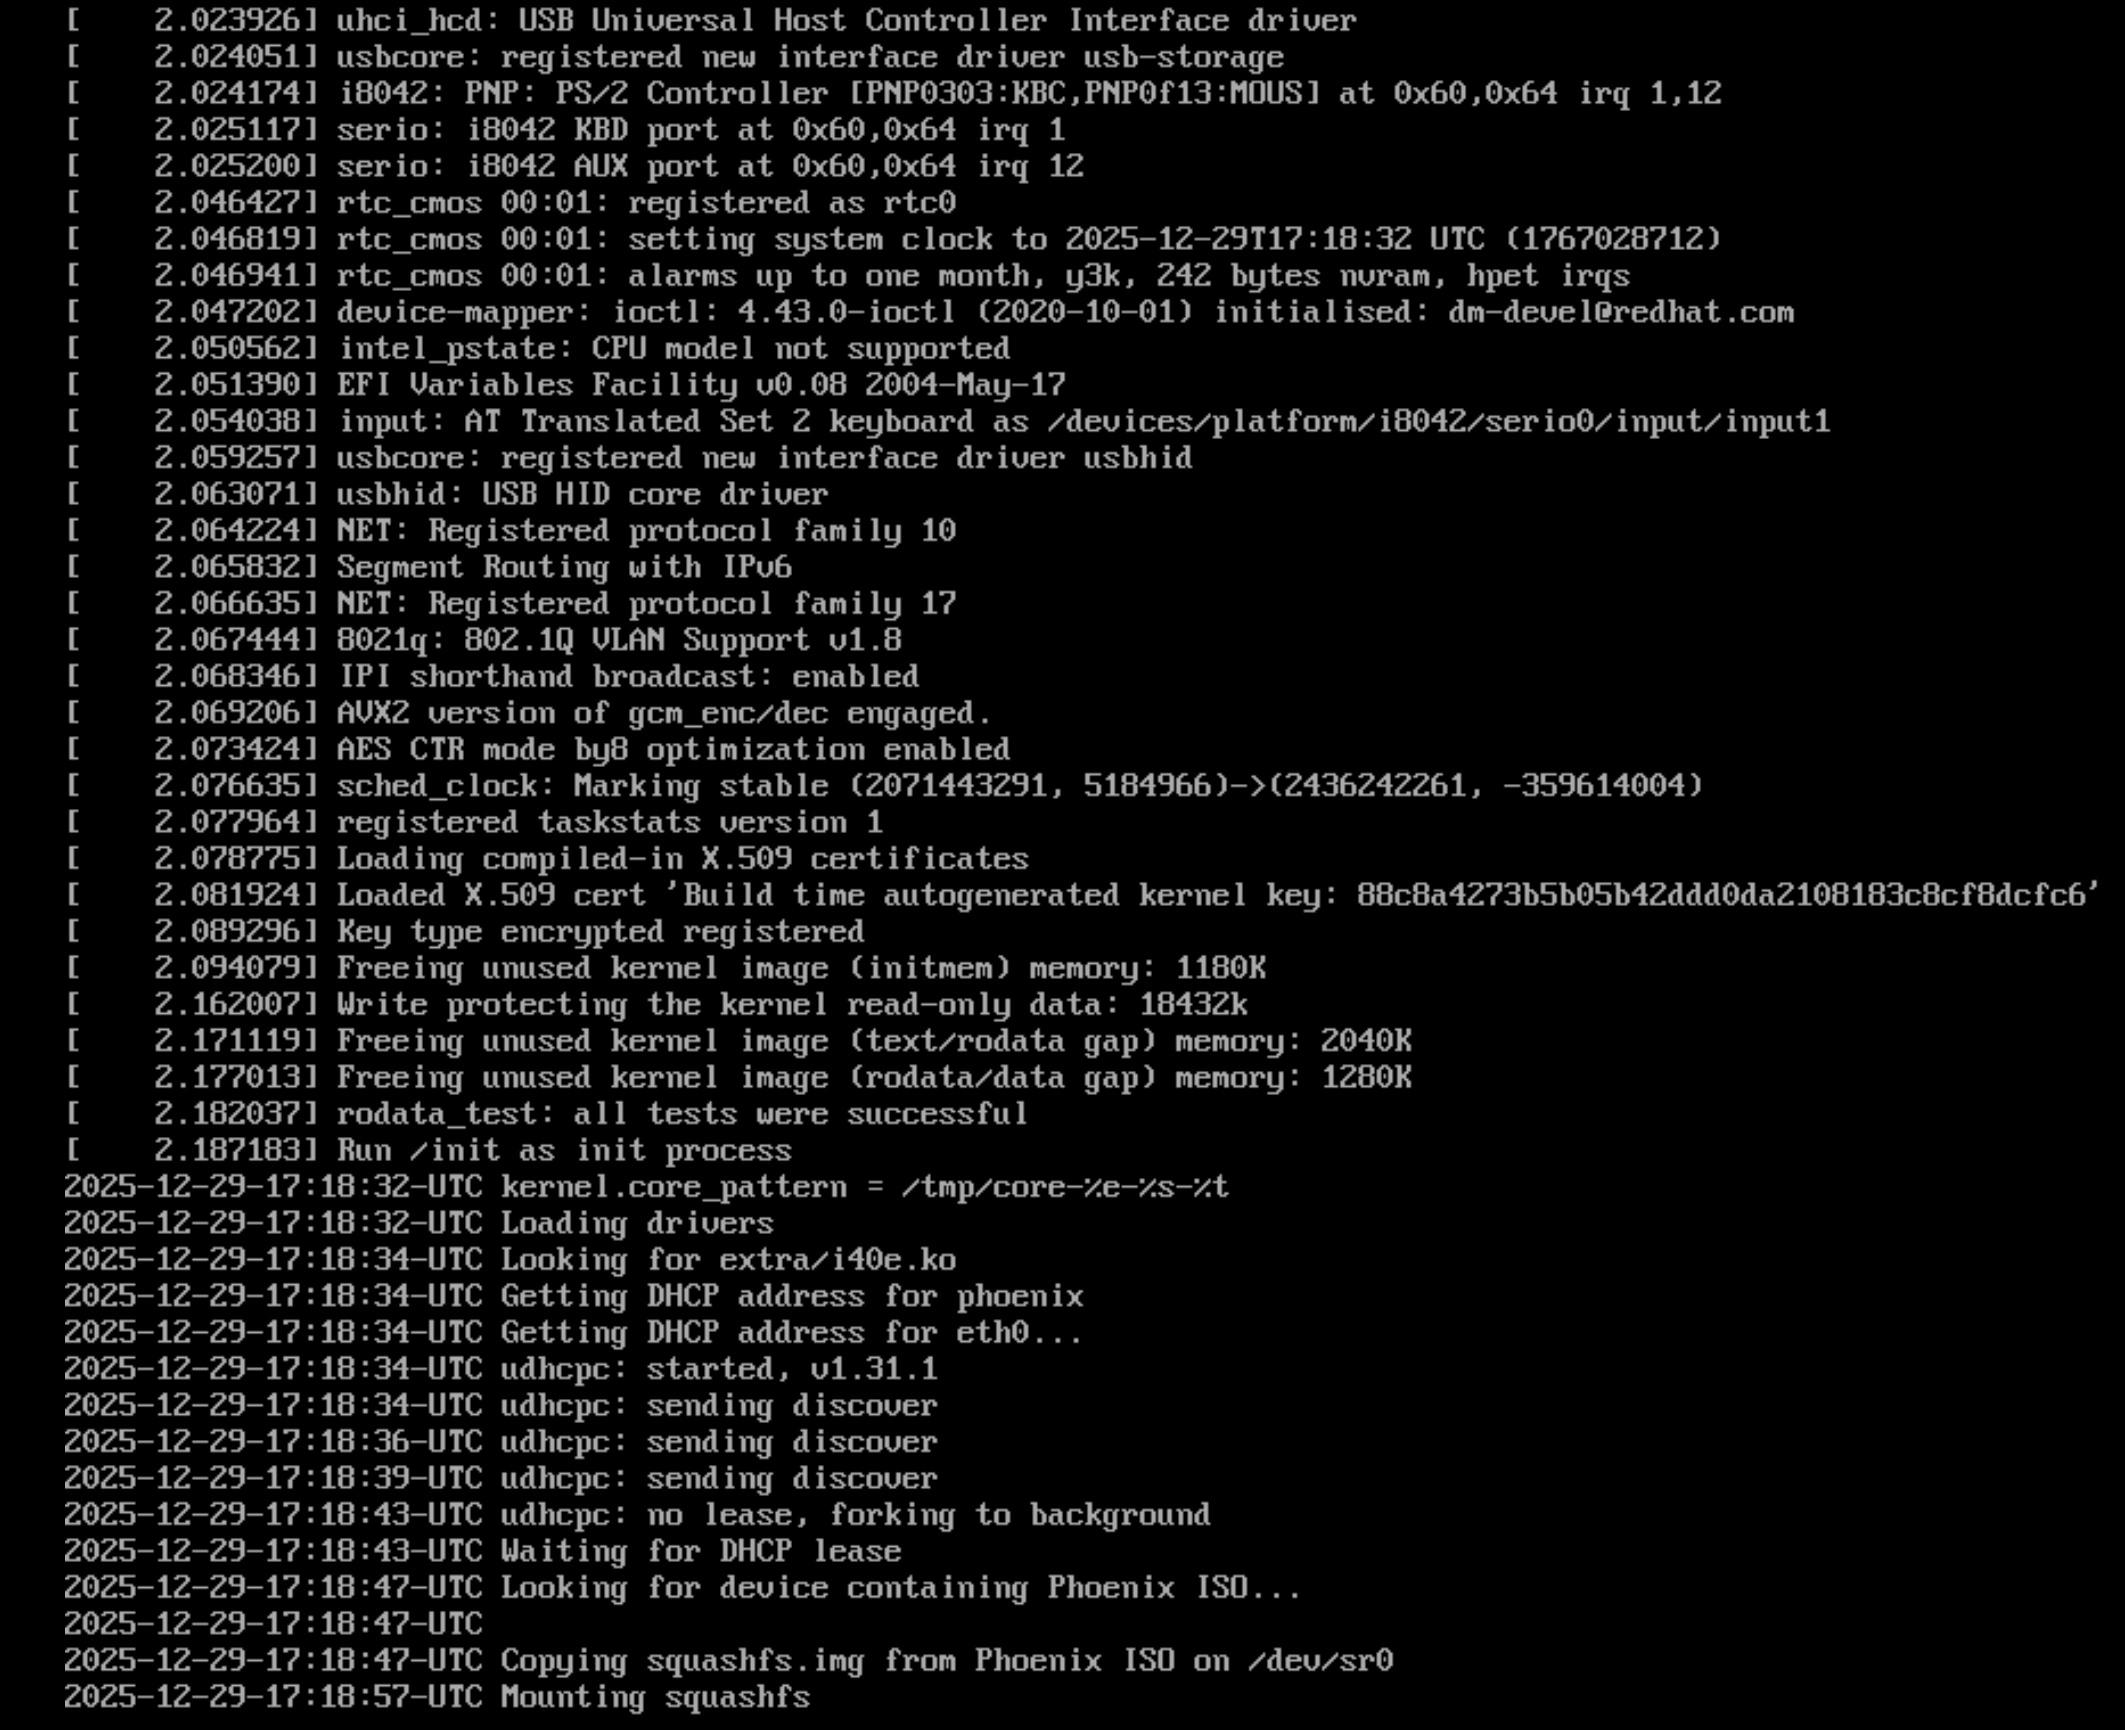
Be patient, it takes quite some time:
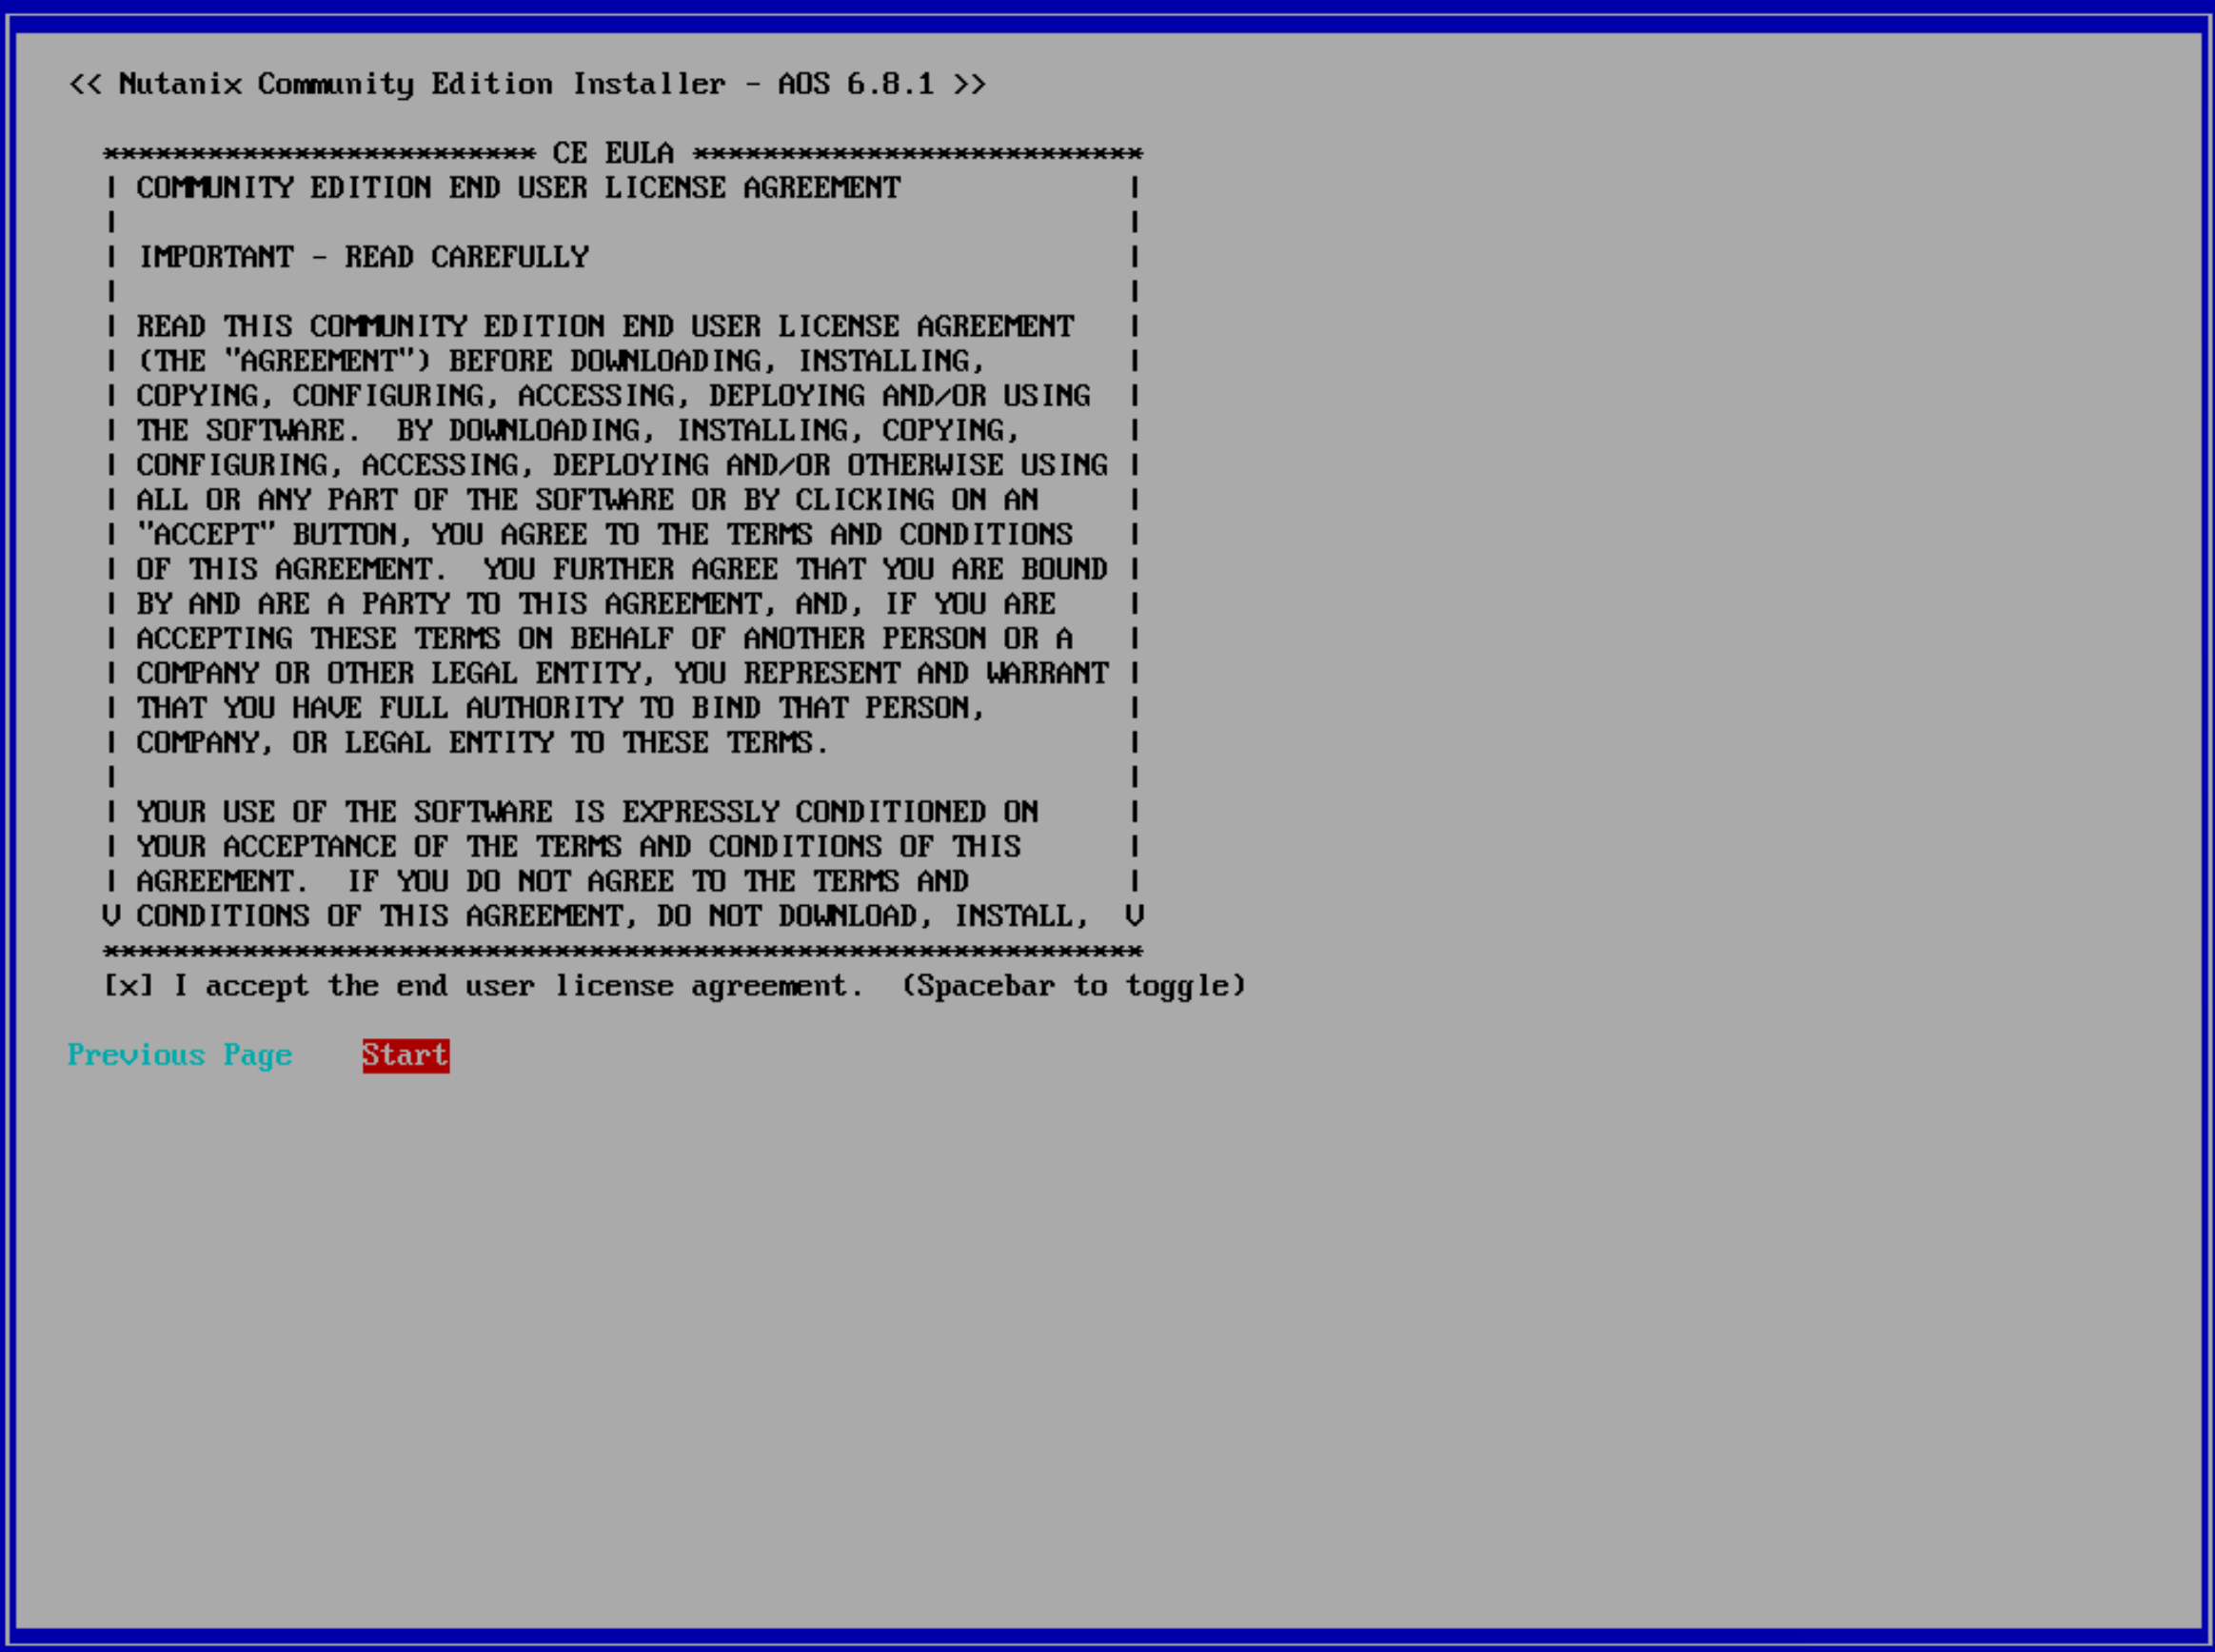
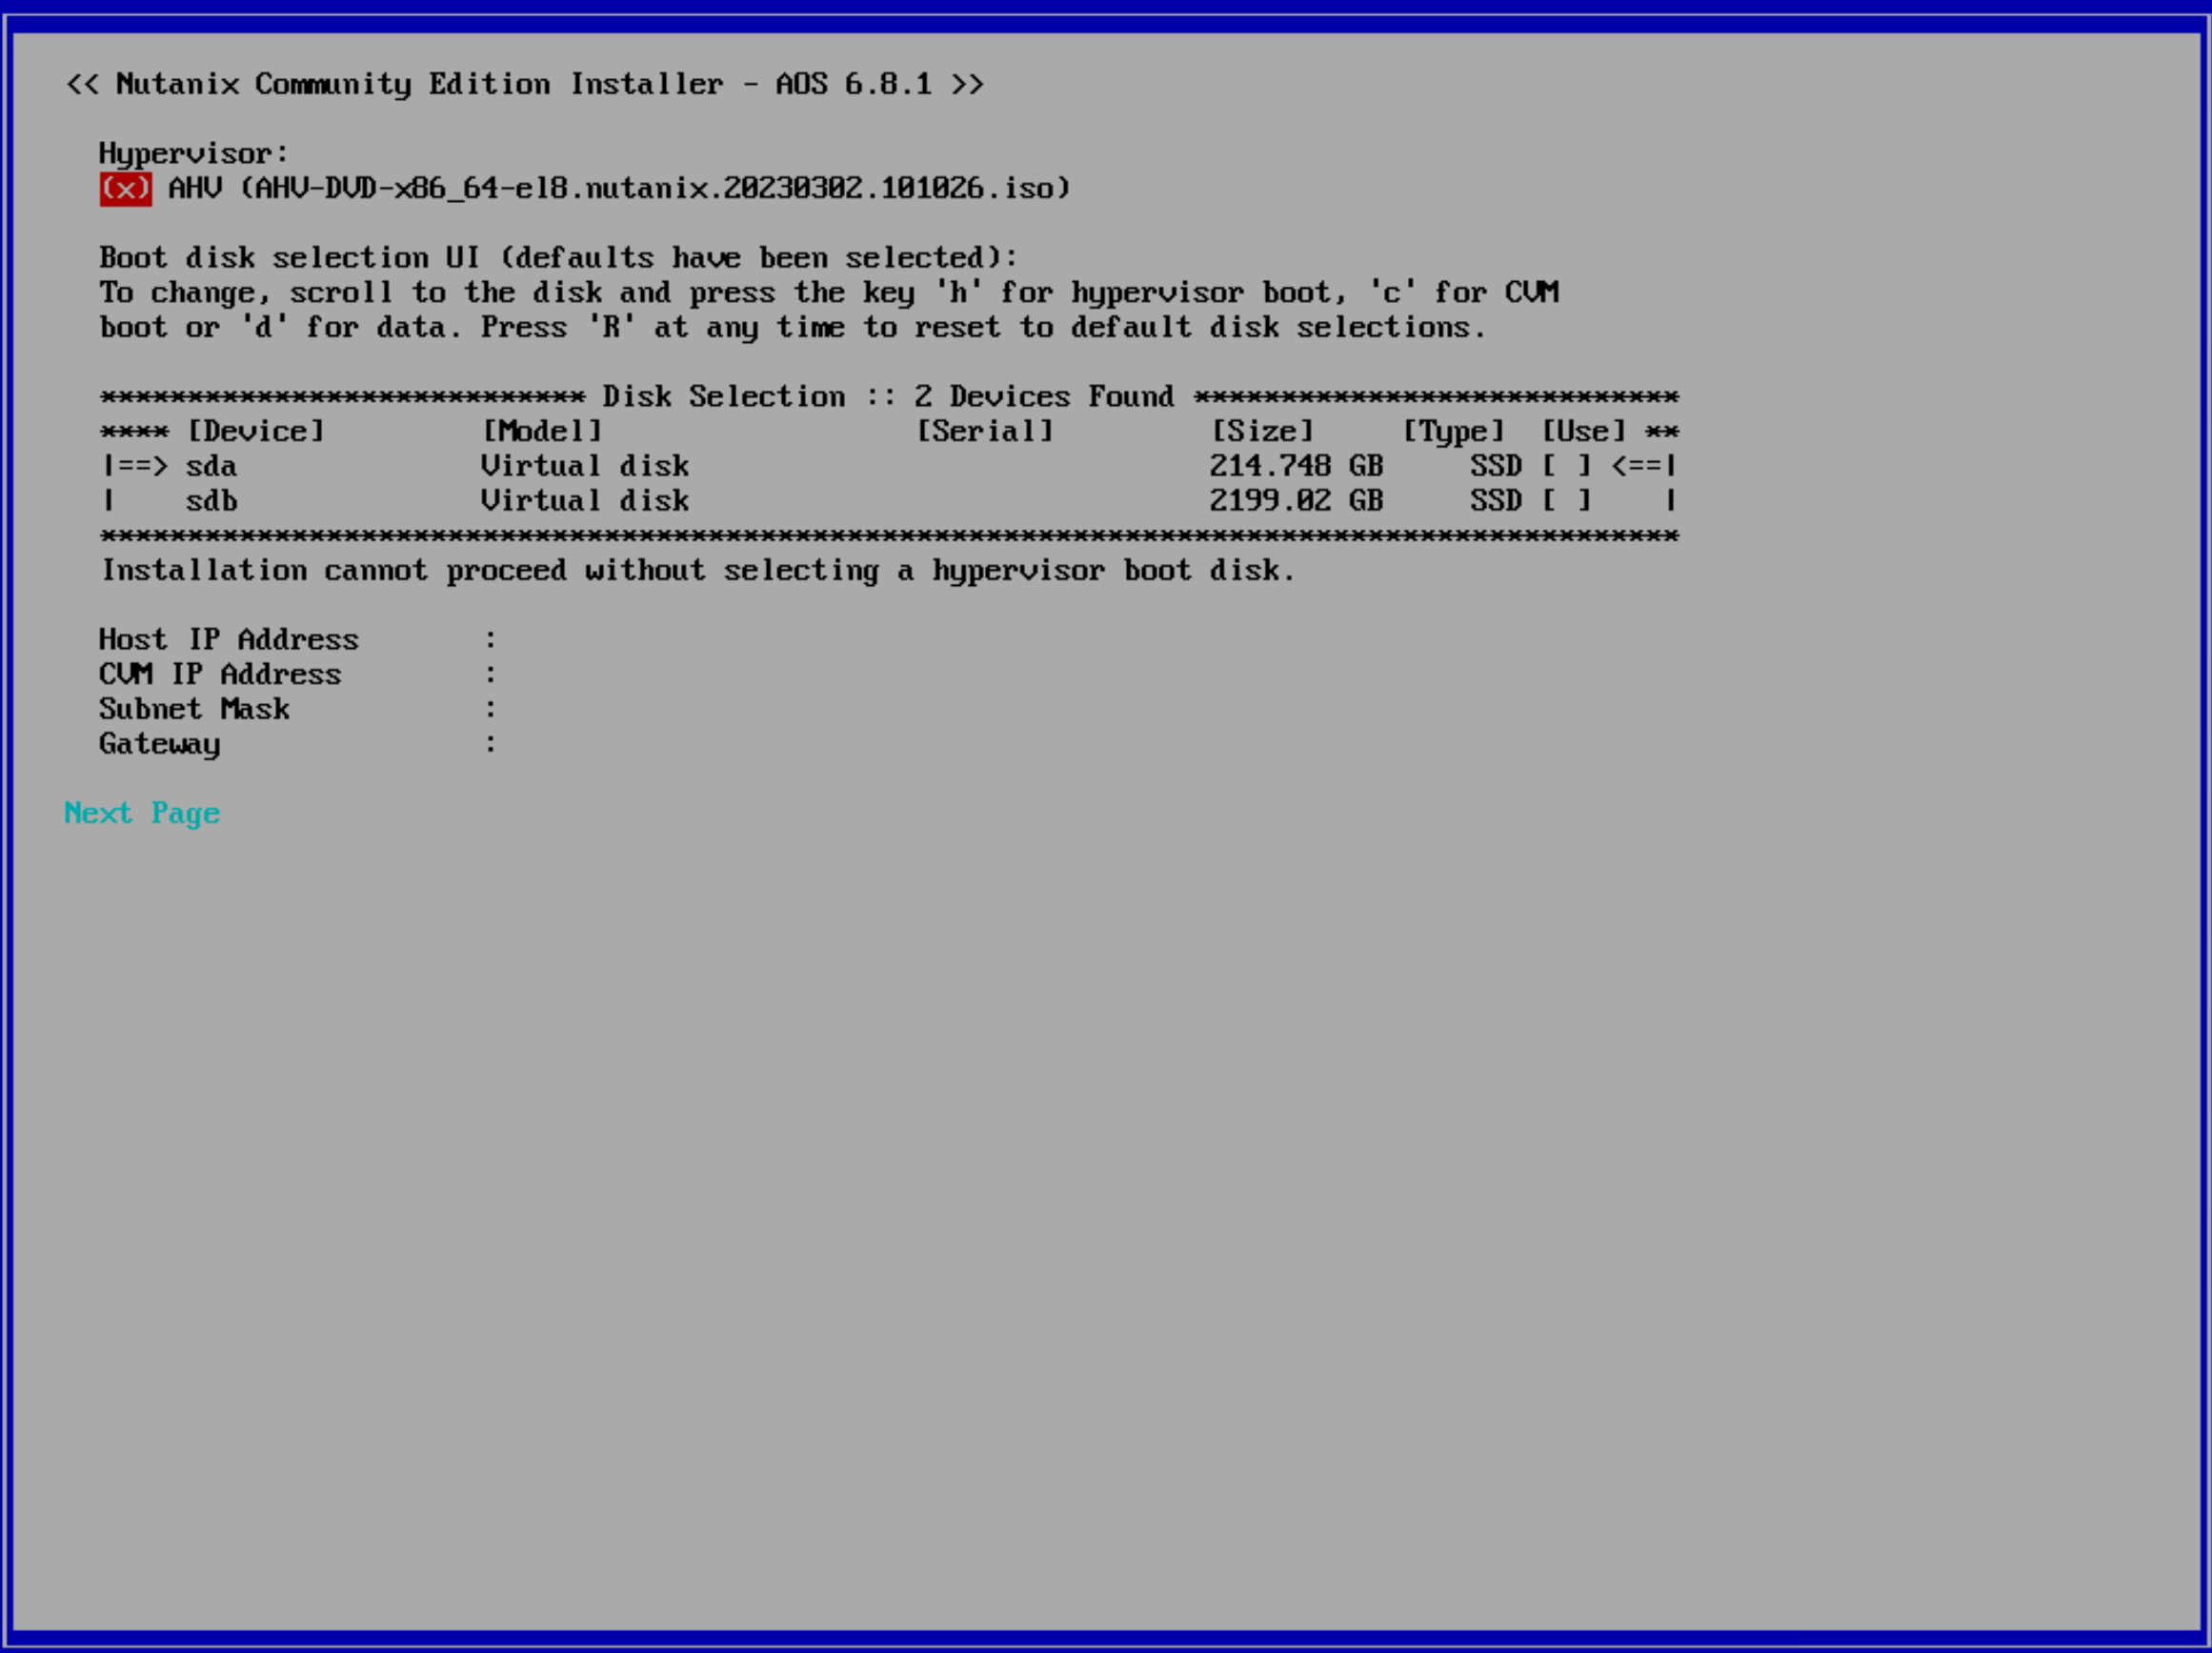
Step 2 — Install CE and Access the AHV Host
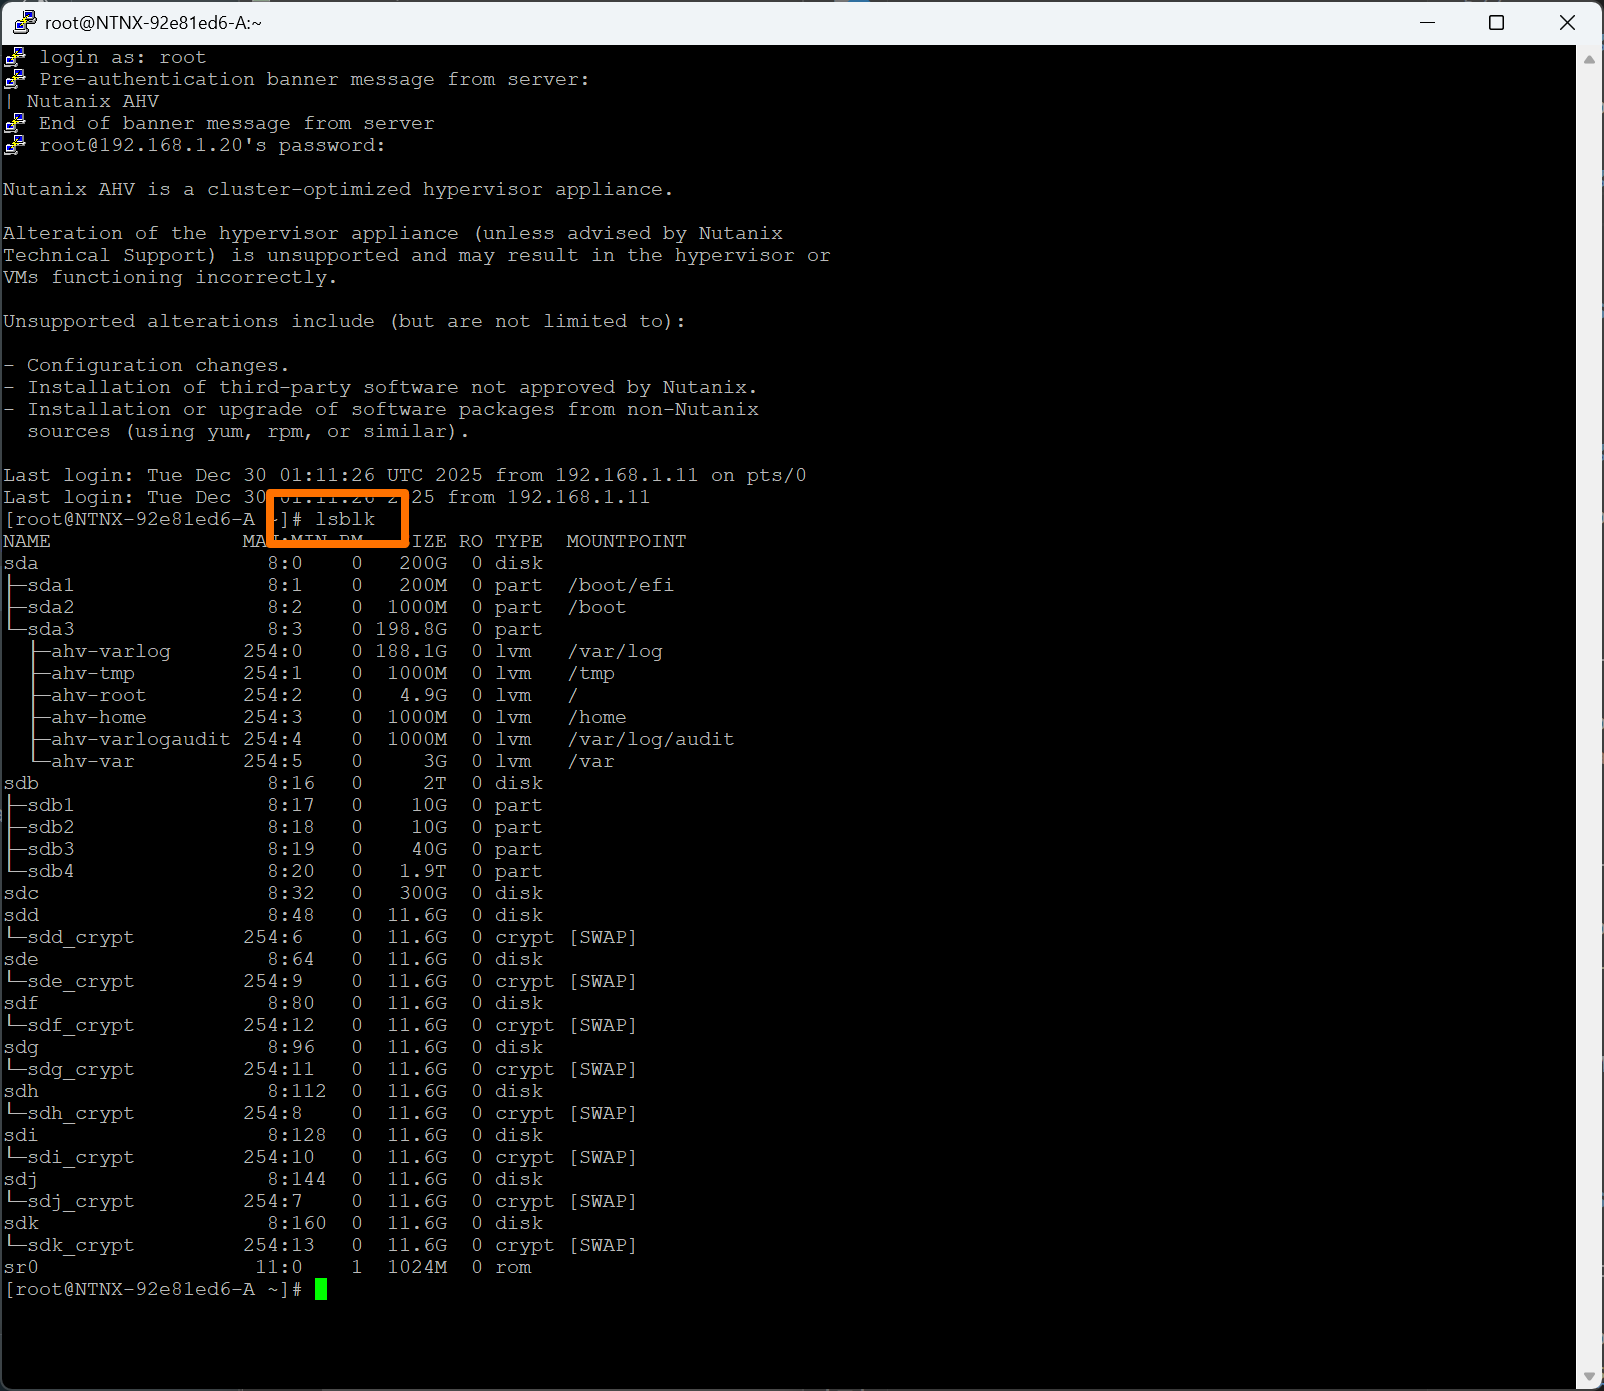
SSH to the AHV host:
ssh root@192.168.1.20
Verify networking:
ip a
Verify disks:
lsblk
I failed to grab the screen capture of the bad output, so this is what good looks like
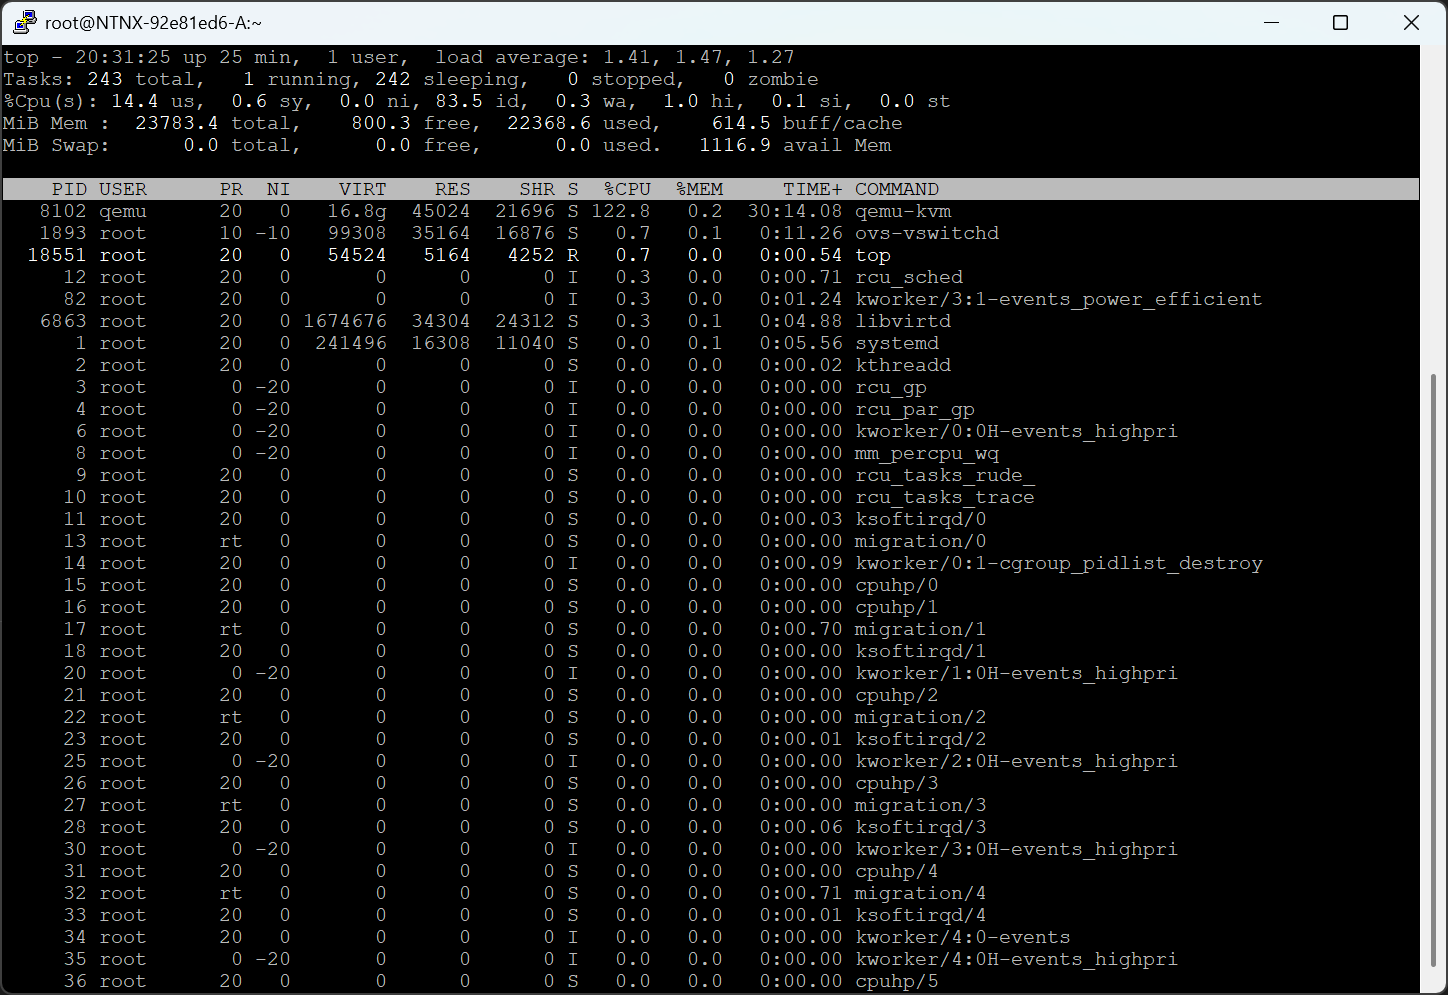
Step 3 — Locate and Access the CVM
List CVMs:
virsh list
Start CVM if needed:
virsh start NTNX-<id>-A-CVM
Ignore empty output from:
virsh domifaddr NTNX-<id>-A-CVM
Use the CVM IP configured during install (example: 192.168.1.22).
SSH into CVM:
ssh nutanix@192.168.1.22

Step 4 — Cluster Is Unconfigured (Expected)
cluster status
Cluster is currently unconfigured. Please create the cluster.
Step 5 — First Cluster Create Attempt (Expected Failure)
cluster -s 192.168.1.22 create
Error:
Cannot create one node backup cluster as not enough boot ssds are present
Meaning: The CVM only sees one disk.
Step 6 — Confirm Disk Visibility on the CVM
lsblk
Only one disk appears → this is the problem.
Step 7 — Fix Disk Presentation (Correct Way)
Inspect Disk Mapping (AHV Host)
virsh domblklist NTNX-<id>-A-CVM
Bad example:
sda  /dev/sdb
vdb  /dev/sdb
vdc  /dev/sdc
Clean Up Duplicate Mappings
virsh detach-disk NTNX-<id>-A-CVM vdb --persistent
virsh detach-disk NTNX-<id>-A-CVM vdc --persistent
Verify clean state:
virsh domblklist NTNX-<id>-A-CVM
Attach Second Disk via XML
cat > /root/cvm-disk-sdc.xml <<'EOF'
<disk type='block' device='disk'>
  <driver name='qemu' type='raw'/>
  <source dev='/dev/sdc'/>
  <target dev='sdb' bus='scsi'/>
</disk>
EOF
virsh attach-device NTNX-<id>-A-CVM /root/cvm-disk-sdc.xml --persistent
Reboot CVM:
virsh reboot NTNX-<id>-A-CVM
Verify from CVM:
lsblk
Step 8 — Create the Cluster (Success Path)
cluster -s 192.168.1.22 create
Ignore messages like:
Zeus is not ready yet, trying again in 5 seconds
Final output:
Running CE cluster post-create script
Success!
Step 9 — Verify Services
Be really patient here - it may take 15-20 minutes. Don’t just CTRL-C.
cluster status
Look for:
- ZeusLeader
- All major services UP
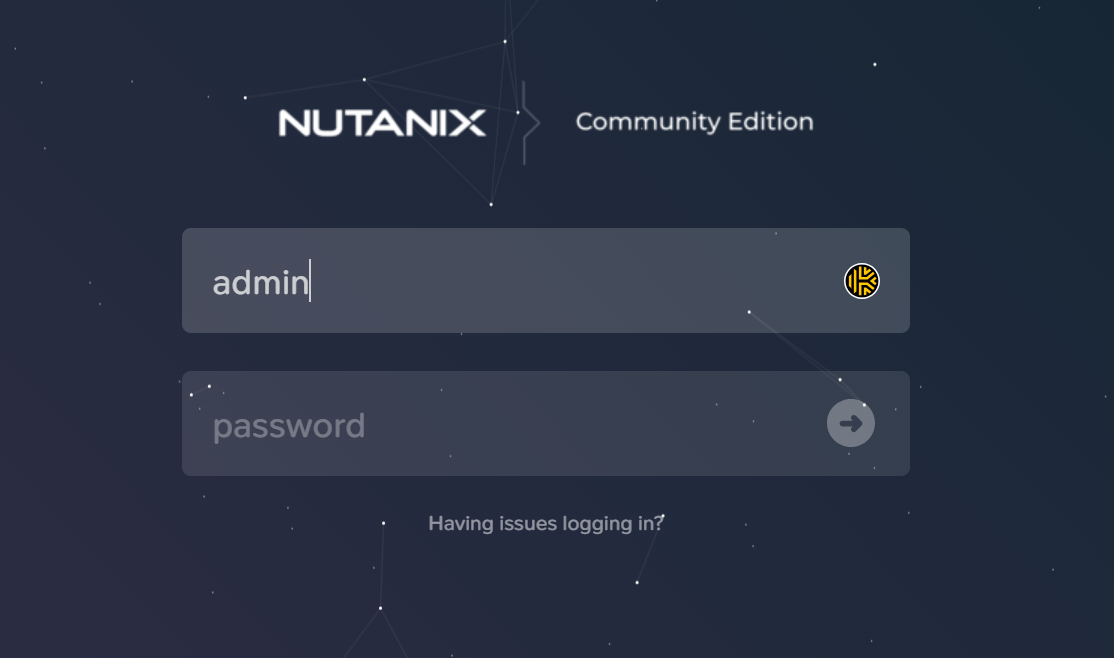
Step 10 — Open Prism
Open:
https://192.168.1.22:9440
Login as admin.
Expect:
- Data Resiliency: Critical (single-node = no replicas)
Final Screenshot

Final Takeaway
This lab teaches what slides don’t:
- AHV vs CVM boundaries matter
- Disk topology beats disk size
- Nutanix errors are protective
- Cluster creation failures are teaching moments
Breaking it — safely — is the fastest way to learn Nutanix.
Opinionated Take (Because Why Not)
Nutanix is not complicated.
It’s honest.
- If disks are wrong → cluster creation fails
- If resiliency isn’t possible → Prism tells you loudly
- If services aren’t ready → it waits
When Nutanix says “no,” it usually means:
“I could continue, but future-you would hate me.”
Final Word
Building CE taught me more than another training slide deck ever could.
The NCP exam isn’t testing memorization.
It’s testing whether you understand why Nutanix behaves the way it does.
Breaking it — safely — is the fastest way to get there.
#dmitrywashere